Add to Cart
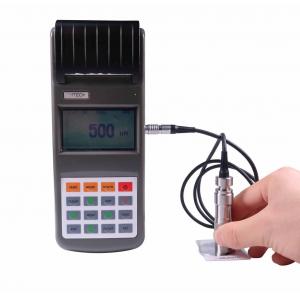
Portable Digital Coating Thickness Gauge TM260 adopts two thickness-measuring methods: magnetic induction (ferrous) and eddy current (non-ferrous). It can rapidly, nondestructively, and precisely measure the thickness of non-magnetic coating on magnetic metal substrate, and the thickness of non-conductive coating on non-magnetic metal substrate. This paint meter can be equipped with 6 optional probes for different applications. It is suitable for both field testing and laboratory research.
Product Details Features
● Two operation principles are adapted: magnetic induction (ferrous) and eddy current (non-ferrous) to take non-destructive measurements
● 6 types of probes are available for different applications
● Features two working modes: DIRECT and BATCH& two measuring ways: CONTINUE and SINGLE
● Statistics include the mean, maximum, minimum, test numbers and standard deviation.
● Memory of 500 data
● Two calibration methods for better correction
● Integrated with printer to print the statists values if needed
● Low battery indication and error alarm
● Backlight for the screen
● Auto or manual shutdown
● Conform to the standards of DIN, ISO, ASTMBS.
| Standard Delivery | |
| Main unit | 1 |
| Probe | 1 |
| Substrate | 1 |
| Calibration foil | 1 |
| Charger | 1 |
| Printing paper | 1 |
| certificate | 1 |
| Warranty card | 1 |
| Instruction manual | 1 |
| Probe types | F | N | |
| Measuring methods | magnetic induction | eddy current | |
| Measuring range | 0 ~1250 μm | 0 ~1250 μm, 0 to 40μm | |
| Minimum resolution | 0.1μm | ||
| Tolerance | Zero point calibration | ±(3%H+1)μm | ± (3%H+1.5)μm |
| H means the thickness of tested piece | |||
| Two points calibration | ±[(1~3)%H+1]μm | ±[(1~3)%H+1.5]μm | |
| H means the thickness of tested piece | |||
| Measuring condition | Min. curvature radius (mm) | Convexity 1.5 | Convexity 3 |
| Min. testing area diameter (mm) | Ø7 | Ø5 | |
| Critical thickness of substrate(mm) | 0.5 | 0.3 | |
| Standards | DIN,ISO,ASTM,BS | ||
| Calibration | Zero and foil calibration | ||
| Interface | USB2.0 | ||
| Statistic | Number of measurement, mean, | ||
| Data memory | 500 readings | ||
| Limits | Adjustable with alarm | ||
| Power | Li rechargeable battery | ||
| Operating environment | Temperature: 0~40℃ | ||
| Humidity: 20%~90% | |||
| No strong magnetic field | |||
| Dimensions (mm) | 215×84×42 | ||
Optional Probes and Application Guide
| Probe model | F400 | F1 | F1/90º | F10 | N1 | F5 | |
Operating | Magnetic induction | Eddy current | |||||
| Measuring range (µm) | 0-400 | 0-1250 | 0-10000 | 0 to 1250 μm 0 to 40μm (for chrome plate on copper) | 0-1250 | ||
| Low range resolution (µm) | 0.1 | 0.1 | 10 | 0.1 | 0.1 | ||
| Accuracy | One-point | ±(3%H+1) | ±(3%H+10) | ±(3%H+1.5) | ±(3%H+1) | ||
Two-point | ±[(1~3)H%+0.7] | ±[(1~3)H%+1] | ±[(1~3)%H+10] | ±[(1~3)%H+1.5] | - | ||
| Measuring conditions | Min curvature of the min area (mm) | Convex 1 | 1.5 | Flatten | 10 | 3 | Angle |
| Diameter of the min area (mm) | φ3 | φ7 | φ7 | φ40 | φ5 | φ7 | |
| Critical thickness of substrate (mm) | 0.2 | 0.5 | 0.5 | 2 | 0.3 | 0.5 | |